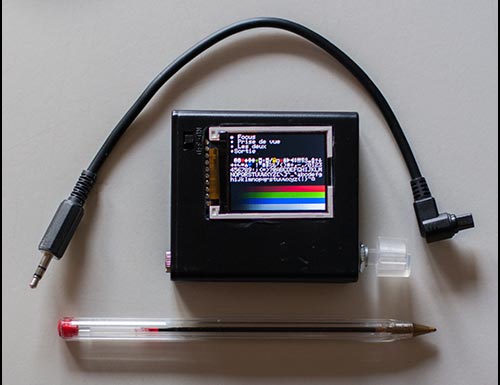
It’s my first post in English on this blog, just to get to the broader English crowd of the maker world. I’ll present my latest project, the fifth iteration in my quest to create a remote control for my DSLR.
My requirements were :
- Small
- Rechargeable battery powered, able to work for a full night non-stop
- Easy to use in the dark
- Easy to use with gloves
- Minimal impact on night vision (more on that later)
- Set intervals from 100th of a second to hours
- Can do a pre-focus to wake up the DSLR before the photo
- Can manage mirror lock-up mode
- Any other function the « traditional » remotes have
There’s a night-mode, where all the LCD turns red, useful for astro-photography, when you need to be able to look at it without compromising your acquired night vision.
The interface is limited to a single rotary knob you can push to validate your choices. It remains easy and intuitive to use even when it’s minus 20°C and it’s pitch black.
The output is a standard 3.5mm stereo jack, you can use different cables to control different brand of DSLRs.
Now for the parts :
A dremel-customized 4AA battery box, with on-off switch, from eBay

An Arduino Mini Pro (3.3V, 8MHz)


A Sparkun Rotary encoder with switch

A Sparkfun 1000mAh LiPo rechargeable battery

A Sparkfun LiPo Micro-USB battery charger

A CNY74-4 Opto-isolator chip

A 3.5mm Stereo Jack

Plus two 47Ω resistors (to drive the CNY74-4), a bunch of wires an some prototype board.
Here is a inaccurate but close enough representation of the circuit made in Fritzing:

The push-button and rotary encoder are in fact one part, and the lipo charger is a different model. The connector on the bottom is the LCD, the one on the top is the Stereo jack connector.
Here is the (messy) soldered board, in it’s final enclosure, before I flood it with hot glue :
 And here is the Arduino 0022 sketch (sorry the texts are in french) + the modified LCD library (the original library is written by Adafruit industries, thanks goes to them). :
MiniComColor_016.zip (22ko, 20ko compiled)
Part of the code is not used (like the driving of the RGB LEDs in the rotary encoder), but it works well like it is right now. I also don’t use the µSD card slot on the LCD, and two of the four ports on the CNY74-4.
There are three major modes, plus a test screen and some configuration bits (stored in EEPROM) :
- Astro – fit for astro-photography, chains exposure with the same duration
- Unique – one shot only
- Increment – The next exposure is computed using the current one and a fixed value
Depending on the current mode, you have access to :
- A pre-start delay, from 0 to 999 seconds
- The duration of the exposure, in HH:MM:SS.mmm format
- The Increment to add to the next exposure, in HH:MM:SS.mmm format
- The pause between exposure, in HH:MM:SS.mmm format
- The number of photos from 0 (infinite) to 9999
On The test screen, you can test Focus and Snapshot separately
In the configuration, you can set a sleep time for the LCD (the backlight is set to 0 if there is no rotation or push on the knob), Set day (full colour) or night (red only) mode. Choose the brightness of the LCD backlight. Set a pre-focus delay before the snapshot, to wake up the DSLR after a long time between shots. The minimal time between two shots in milliseconds (it varies depending on the DSLR model). The mirror lock-up mode (useful for perfect landscapes). And of course the ability to save and restore settings.
I have yet to test it for reliability, but as I already did successfully with the previous version, I’m confident (I already made a 6 hour continuous shooting with a smaller battery and power to spare).
The next version, if if there will be one, will use the RGB LEDs of the rotary encoder, and also drive a small piezo buzzer to signal the end of a long shooting session.


Looks good. keep the good work)
Very nice writeup! I like the details and associated part numbers.
Great project. The connector on the opposite of the jack looks like the Nova N3 plug for Canon. If yes, where didi you find it. I wanted to develop a similar project but I was unable to find the connector.
I got it from a « el-cheapo » chinese remote from ebay.
Found. Thank you.
Ping : MiniCom, an Arduino Based LCD DSLR Remote Control « adafruit industries blog
Will this work with Nikons, or is it Canon only?
With the right cable, it will (that’s partly why I made it with a female jack connector).
Salut,
Super projet !
Juste pour info (je ne trouve pas d’autre moyen que ce commentaire), tu as quoi comme materiel photo (objectifs) pour prendre de si belles photos d’oiseau ?
Canon 20D et Canon 7D, mais comme mentionné plus haut, un simple câble devrais suffire pour commander du Nikon ou du Sony. Je crois savoir que pour du Panasonic, c’est un tout petit peu plus compliqué, mais pas exagérément.